
PubSub Quick Start
PubSub lets you receive real-time Kiteworks events at a URL of your choice. When something happens in your Kiteworks instance — a user logs in, a file is uploaded, a folder is shared — PubSub delivers that event as an HTTP POST to a webhook endpoint you register.
This guide walks you through registering a webhook and receiving your first event in under 15 minutes.
In this guide
- Prerequisites — version and network requirements
- Key concepts — webhooks, subscriptions, and event subjects
- Step 1: Register a webhook — create a webhook from the Admin Portal UI
- Step 2: Understand the event payload — envelope structure and fields
- Step 3: Build your webhook receiver — working server examples in Python and TypeScript
- Managing webhooks — view, edit, enable, disable, and delete
- Troubleshooting — common issues and fixes
Prerequisites
Kiteworks Core 9.4.0 or later
PubSub is fully supported starting from this release.
A publicly reachable HTTPS URL
Your webhook receiver must be accessible over HTTPS from your Kiteworks instance. During development, tools like ngrok can expose a local server to the internet.
Access to Admin Portal — or a Kiteworks API license
You can register and manage webhooks in two ways:
- Admin Portal UI — no API license required. Go to Application Setup > Event Subscriptions.
- PubSub REST API — requires a Kiteworks API license and a valid access token. See Authentication for how to obtain one.
Key concepts
Before you start, familiarise yourself with these three terms:
| Term | What it means |
|---|---|
| Webhook | An HTTP endpoint you own that Kiteworks POSTs events to |
| Subscription | A filter pattern that controls which events trigger your webhook |
| Event subject | A dot-separated identifier for an event type, e.g. events.user.login |
Subscription patterns use dot-separated subject syntax. A * matches exactly one segment;
a > matches one or more trailing segments. For example:
| Pattern | Matches | Does not match |
|---|---|---|
events.user.login |
events.user.login |
events.user.logout |
events.user.* |
events.user.login, events.user.logout |
events.filesystem.upload |
events.> |
Everything under events.* |
— |
Step 1: Register a webhook
The easiest way to register a webhook is through the Admin Portal UI — no API license required. In Admin Portal, go to Application Setup > Event Subscriptions and click + Add Webhook URL.
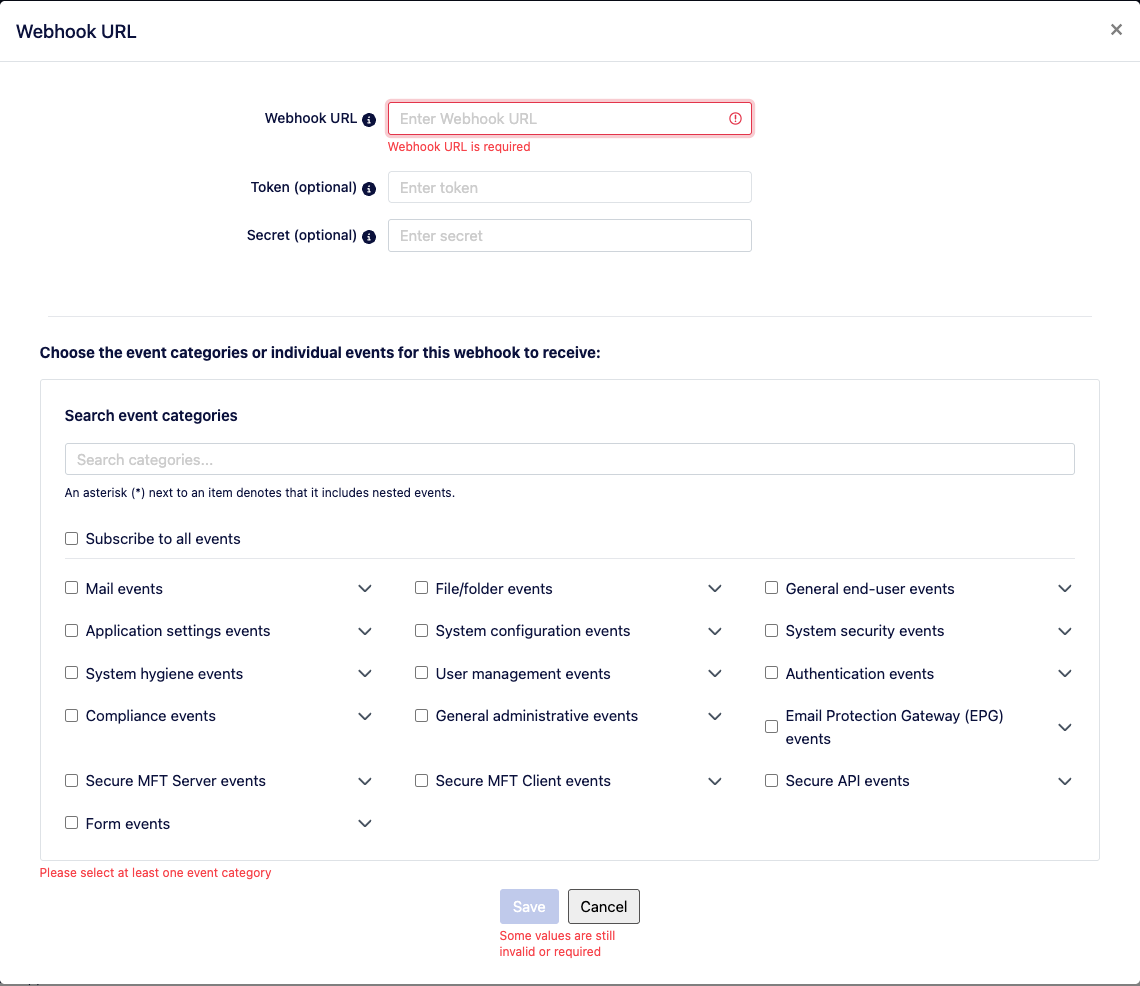
Fill in the following fields:
| Field | Required | Description |
|---|---|---|
| Webhook URL | Yes | The HTTPS URL of your receiver endpoint. Kiteworks will POST events to this address. |
| Token | No | An outbound authorization token. When set, Kiteworks forwards this value verbatim as the Authorization header on every delivery to your receiver. See the note below. |
| Secret | Yes | A shared secret used to sign deliveries with an HMAC-SHA256 signature sent in the X-KW-Signature header. Useful for advanced security validation in custom receivers. |
| Event categories | Yes (at least one) | Select one or more event categories — or individual events within a category — that this webhook should receive. An asterisk (*) next to a category name means it includes nested event types. |
There are two separate
Authorization headers involved when a webhook fires:
- The Kiteworks API request header — used when calling the PubSub API to create or manage webhooks. This is your Kiteworks access token (
Authorization: Bearer <your_kiteworks_token>) and is consumed by Kiteworks itself. - The outbound delivery header — the optional Token field in the webhook registration. When set, Kiteworks sends this value as-is in the
Authorizationheader of every event delivery POST to your receiver URL.
Splunk <your_hec_token> — the exact format Splunk requires in the Authorization header of every incoming HEC request.
Click Save. The new webhook appears immediately in the Event Subscriptions list.
/pubsub-ext/webhooks. See the Create webhook API reference for the full request schema.
Step 2: Understand the event payload
Every delivery is a JSON POST with this envelope:
{
  "tenantId": "0",
  "webhookId": "1a51a2bf-86e8-40e8-a53b-4edc6936db46",
  "payload": {
    "event_name": "login",
    "user_id": 42,
    "username": "jane.doe@example.com",
    "ip_address": "203.0.113.5",
    "created": 1776039606.41,
    "tenant_id": 1,
    "host": "your-kiteworks-instance.com",
    "transaction_id": "WwbzN2nOcT5Qd2VjQIiKV374DvoUtbp9Gi3f4loBfuSKTk",
    "user_agent": "Mozilla/5.0 ...",
    "successful": true,
    "guid": "cad3c89d-36a1-44bd-b91f-14eba8aafecd"
  }
}
The outer envelope fields are:
| Field | Description |
|---|---|
tenantId |
Reserved for internal Kiteworks use. Do not rely on this value in your application logic. |
webhookId |
The UUID of the webhook registration that triggered this delivery. Useful for routing when multiple webhooks point to the same receiver URL. |
payload |
The original Kiteworks event. Use event_name to identify the event type and successful to determine whether the action completed without errors. |
Step 3: Build your webhook receiver
The examples below start a local HTTP server that accepts incoming POST requests and prints the event details.
pip install flaskfrom flask import Flask, request
app = Flask(__name__)
@app.route("/webhook", methods=["POST"])
def receive_event():
event = request.get_json()
print(f"Webhook: {event['webhookId']}")
print(f"Tenant: {event['tenantId']}")
print(f"Event: {event['payload']['event_name']}")
print(f"User: {event['payload']['username']}")
print(f"Successful:{event['payload']['successful']}")
return "", 200
if __name__ == "__main__":
app.run(port=3000)import express, { Request, Response } from "express";
const app = express();
app.use(express.json());
app.post("/webhook", (req: Request, res: Response) => {
const event = req.body;
console.log("Webhook ID:", event.webhookId);
console.log("Tenant ID: ", event.tenantId);
console.log("Event: ", event.payload.event_name);
console.log("User: ", event.payload.username);
console.log("Successful:", event.payload.successful);
res.status(200).send();
});
app.listen(3000, () => console.log("Receiver listening on port 3000"));Start the server and — when a user on your Kiteworks instance logs in — you will see the event printed to your console.
Managing webhooks
All webhook management is available from Admin Portal > Application Setup > Event Subscriptions. The page lists every registered webhook with its URL, subscribed event categories, enabled/disabled toggle, and delivery status (Success or Error).
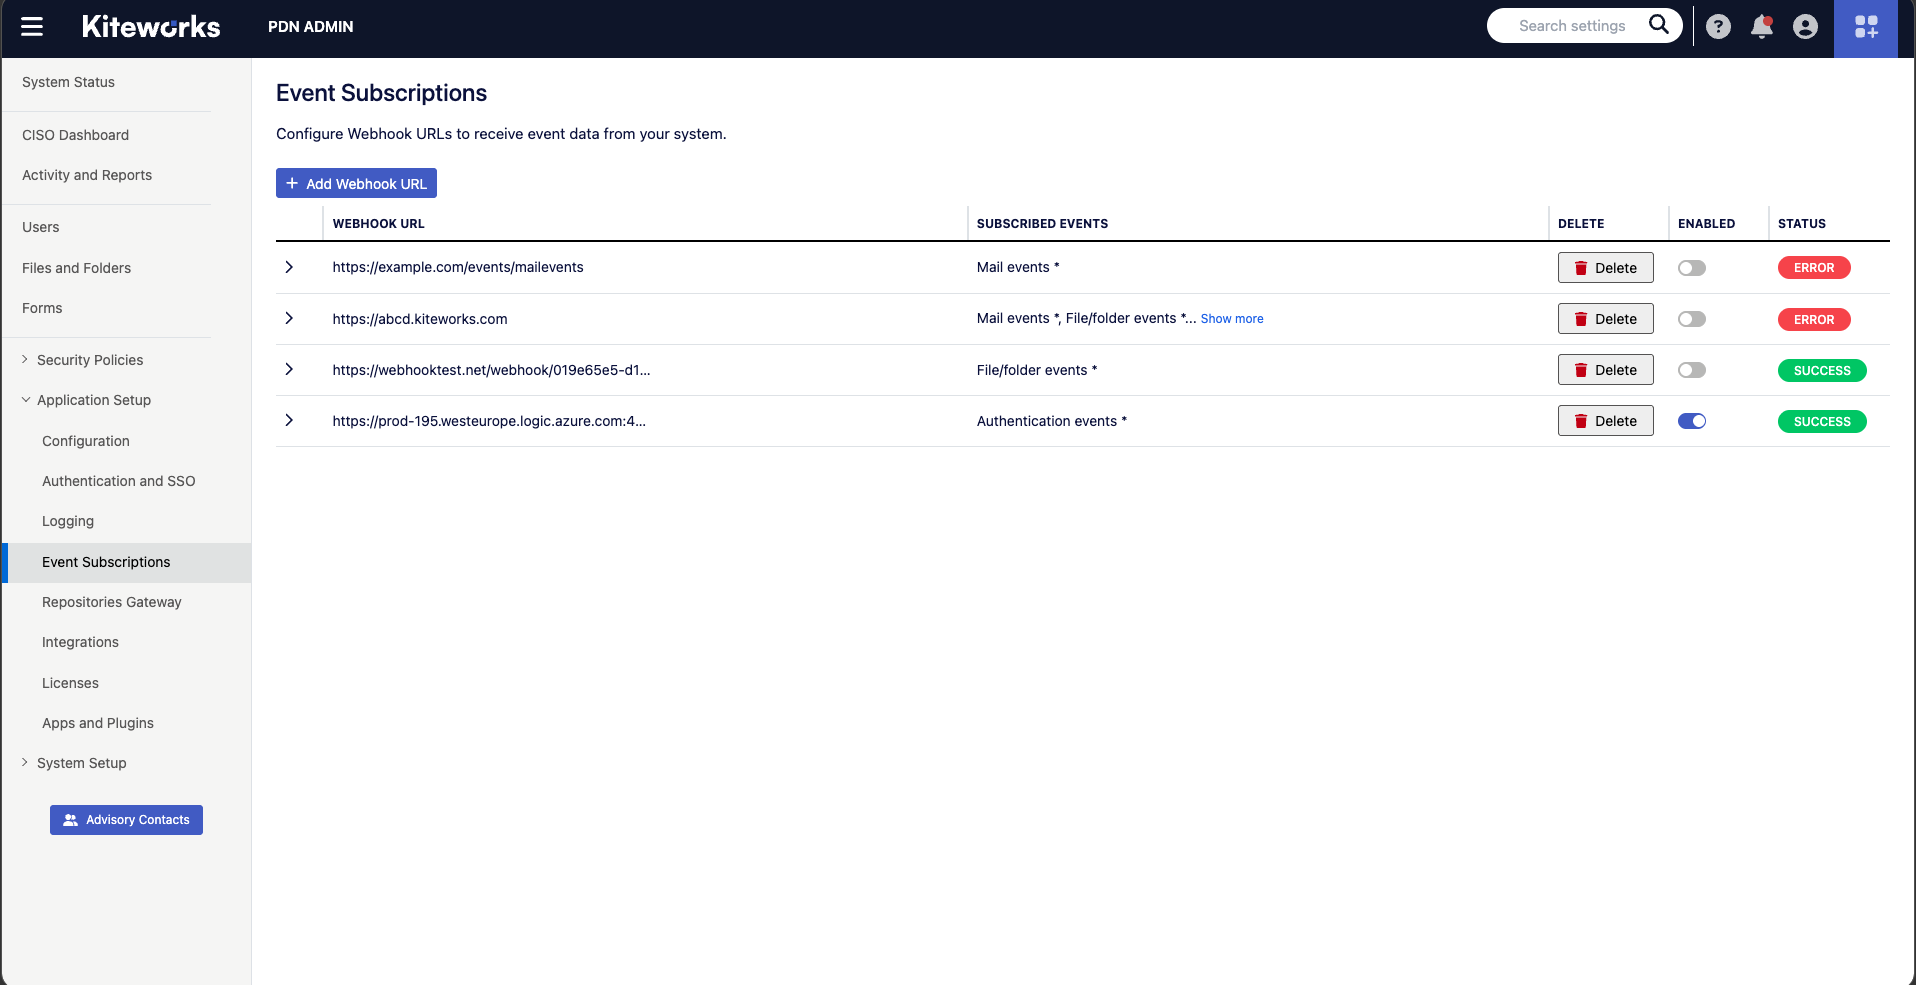
View registered webhooks
Open Application Setup > Event Subscriptions to see all webhooks. Each row shows the webhook URL, the event categories it is subscribed to, whether it is enabled, and its last delivery status.
API alternative (requires API license) — base path /pubsub-ext/webhooks:
GET all webhooks ·
GET a specific webhook
Edit a webhook
Click the expand arrow on any row in the Event Subscriptions list to open the edit form. You can update the Webhook URL and change the subscribed event categories. You must keep at least one event category selected. Click Save to apply the changes or Cancel to discard them.
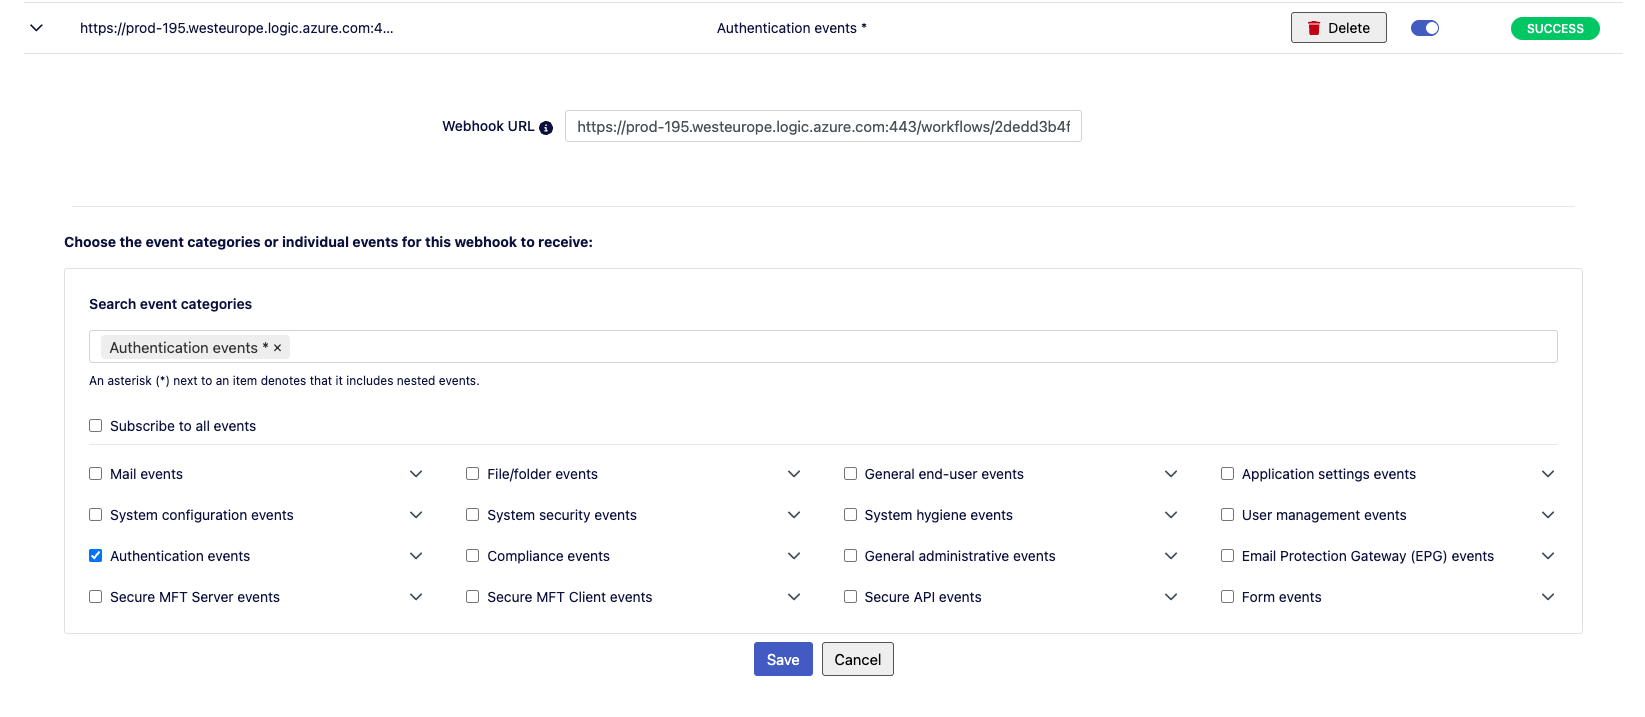
API alternative (requires API license): PUT (full update) · PATCH (partial update)
Enable or disable a webhook
Use the Enabled toggle on any row in the Event Subscriptions list to pause or resume deliveries without deleting the webhook.
API alternative (requires API license):
PATCH webhook with {"enabled": false}
Delete a webhook
Click the Delete button on a webhook row in the Event Subscriptions list. This permanently removes the registration and stops all future deliveries to that URL.
API alternative (requires API license): DELETE webhook
Troubleshooting
I receive an HTML page instead of a JSON response
Your Kiteworks instance is running a version earlier than 9.4.0. PubSub is fully supported starting from Kiteworks Core 9.4.0. Contact your administrator to upgrade.
I receive HTTP 401 Unauthorized when calling the API
Your Kiteworks access token is missing, malformed, or expired. Confirm that your request
includes Authorization: Bearer <token> in the request header and that
the token is still valid. See
Authentication
for how to obtain or refresh a token.
My webhook is not receiving events
-
Check it is enabledOpen Application Setup > Event Subscriptions and confirm the Enabled toggle is on for your webhook.
-
Check your subscriptionThe
*wildcard matches exactly one segment.events.user.*matchesevents.user.loginbutevents.*does not — it does not match the third segment. Useevents.>to match all events underevents. -
Check your receiver is reachableYour Kiteworks instance must be able to reach your receiver over HTTPS. Use a tool like ngrok if you are running locally.
-
Check your receiver returns 2xxKiteworks retries non-2xx responses with exponential backoff: after 5 seconds, 5 minutes, 1 hour, then 1 day. If your server is returning an error code, the event will eventually be dropped after all retries are exhausted.
I am receiving the same event multiple times
PubSub has no duplicate detection — each webhook registration is independent. If you accidentally registered the same URL more than once, open Application Setup > Event Subscriptions, identify the duplicate entries by URL, and delete the extras using the Delete button.
I get an error about overlapping subscriptions when registering
PubSub enforces that no two webhooks can have overlapping subscription patterns across your entire account. For example, if one webhook already subscribes to all File/folder events, you cannot register another webhook for a specific nested file event — that subject is already covered. Either update the existing webhook to include the new event, or remove the broader subscription so you can add a more specific one.
I want to subscribe to all events
In the Add Webhook URL dialog, check Subscribe to all events at the top of the event category list. This subscribes the webhook to every event type. Be prepared for potentially high delivery volume.